 |
 |
| Russian SPS-1 Pistol | Russian APS Rifle |
 |
|
|
Close up of ammo (7.62 x 39 shown for comparison) |
|
This section contains brief discussions of various ballistics and shooting related topics as requested by correspondents. If you have a question you have been trying to find an answer to (keep 'em ballistics and shooting related--see your minister for the mysteries of life) email me by clicking here and I'll do my best to find the answer for you and if it is of general interest, publish it here. If you can contribute additional input to one of the answers I'd would appreciate hearing from you too.
Check back frequently as new topics are always being added.
On this page:
What is the best procedure to
zero a
rifle?
What safety precautions should be taken when shooting at
steel plate targets?
What is the best method to measure your sight
height (line of sight)?
What is the penetration of bullets fired into water and
underwater?
What is the performance difference
between lead, steel and bismuth shot?
How are the shotgun shot size designations
determined?
What is the "Coriolis
Effect" and do I have to worry about it?
How fast is a bullet rotating?
What is the proper diameter for flash holes?
What is the difference between short, medium, and
long triggers on the Colt 1911 .45 pistol?
What are "item" and "option"
targets?
Q. What is the best procedure to zero a rifle?
A. First, I assume you know how to properly shoot: trigger control; natural point of aim; and use of a rest. While there are all kinds of "methods" the one that has worked best for me is thus. You will need access to a range with at least 100 yards and preferably 200 yards, a shooting bench, and a solid rifle rest or sand bags, and you will need to have someone with you as a spotter with a spotting scope or binoculars. You should start with your bore clean and dry and all sight mounting and stock screws tight. If you know the characteristics of your ammo (ballistic coefficient and muzzle velocity) you can refine the impact points at 100 and 200 yards later with ballistics software.
1) Pick out a distinct aiming point (not a paper target) on your backstop, preferably at 200 yards. Holding dead center on the aiming point very carefully fire 1 round from the bench. If your spotter tells you that your shot was dead on or within an inch or two skip to step 4.
2) Adjust your sights in the horizontal plane, using a bold correction, and fire one shot. Don't creep up on the aim point-- use bold adjustments. Once you have a "left" and "right" you can split the difference and be on target.
3) Adjust your sights in the vertical plane, using bold corrections, and fire one shot. Don't creep up on the aim point-- use bold adjustments. Once you have a "over" and an "under" you can split the difference and be on target. If steps 2 and 3 are done right you will be on target with a maximum of 4 shots.
4) Using a paper target with a distinct aiming point at 100 yards carefully fire two shots using your best bench technique. They should be very close to your aiming point. If your initial firing was at 200 yards the center of your two shots will be about 2.5" to 3" high at 100 yards. If your initial firing was at 100 yards you will be close to dead center. Make appropriate corrections to put your point of impact 2.5" to 3" directly above your point of aim. Do not not make minor corrections to your scope. If you need to move the point of impact, say 4 inches, move 6 inches and then back 2 inches. Tap the side of your scope after making the adjustment to ensure the reticle is centered and settled. Fire 2 more shots and repeat as necessary. Unless you do not not have a 200 yard range this step doesn't have to be perfect, just very close.
5) At 200 yards fire 3 shots as carefully as you can at a paper target with a distinct aiming point. The center of your group should be centered about or just slightly (about an inch or two so for most loads) above your aiming point. If not make the appropriate corrections using a 3 shot group. At this step you want to be very precise.
6) Abandon the shooting bench. Set up a graphic target (animal or tactical) at 200 yards or as close as you can get to that range and from a field shooting position (sitting or prone work best) carefully fire a 5 shot group. Your 5 shots should be evenly grouped about your point of aim. If the group is larger than 10" fatigue has probably set in (or you are not the marksman you thought you are). Rest for 30 minutes think about trigger control and proper position and try again.
Using this procedure steps 1 through 5 you can get a bench zero on an unknown rifle with a little as 6 rounds if you are careful and maybe a maximum of 10 rounds. I've actually done it 3 rounds! If you are simply changing your load with a previously zeroed rifle you can probably start with step 5.
The table below gives the on target effect of sight adjustments.
| Scope "Click" Adjustment Increment (MOA) |
Movement (in) @ 25 yds |
Movement (in) @ 50 yds |
Movement (in) @ 100 yds |
Movement (in) @ 200yds |
| 1/4 | 1/16" | 1/8" | 1/4" | 1/2" |
| 1/2 | 1/8" | 1/4" | 1/2" | 1" |
| 1 | 1/4" | 1/2" | 1" | 2" |
If you have access to a collimator, mount the device and record the location of the cross hairs so you can easily verify if the sights have gone out of alignment without firing a shot. (See the information on using a collimator on "Page 7" of these Q&A pages.)
You can use a similar procedure for pistols and shotguns with slugs. I suggest 100 yards for the initial pistol range and then fine tune at 50 yards. For shotguns start at 100-125 yards and fine tune at 75.
For additional zeroing tips click here.
Q. What safety precautions should be taken when shooting at steel plate targets?
A. The danger in shooting steel targets comes from the back splatter of the bullet as it breaks up on the target. With a properly hardened and smooth steel target most of the splatter from a perpendicular hit sprays out sideways in a cone about 20 degrees or so from the surface of the plate and not straight back. It should be noted that this splatter will travel 30 yards to as far as 100 yards in some cases, depending on the ammunition, so berms or other barriers may be needed at the sides of the range.
The major problems arise when the plate becomes pitted or the surface becomes curved from impact after use. This can cause unpredictable back splatter which can travel back toward the shooter. In addition, shotgun slugs, low velocity ammunition (nominally below 750 f/s) and very hard projectiles fired at vertically positioned plates may fail to disintegrate on the plate and may bounce straight back or ricochet. Most authorities suggest being at least 10 yards from pistol targets and 25 yards from rifle targets and that the plates be angles slightly forward.
For pistol only use the plate should be through hardened to at least Brinell 375 - 400. For rifle and shotgun slug use the plate should be through-hardened to Brinell 535 - 540.
Some general consideration to keep in mind:
If you are planning to purchase, make, or shoot at steel targets I strongly suggest that you get a copy Porta Target's "Safety and Use Guide" for steel targets. It's available from:
Porta Target
P O Box 418
Grant, FL 32949
312-984-9486
sales@portatarget.com
www.portatarget.com
Q. What is the best method to measure your sight height (line of sight)?
A. Sight height or line of sight height is the distance from the center of the bore to the axis of your eye's sight, at the muzzle, when looking through the sights. This measurement is needed to compute where a bullet will strike in relationship to where the your eyes claim it will. when looking through the sights. See my external ballistics pages for a graphic of trajectory.
For scope sighted rifles the easiest method measure this distance is to measure from the firing pin hole in the bolt face to the bottom of the scope tube (or measure the bolt diameter, divide by 2, and add the distance from the top of the bolt to the bottom of the scope) and then add 1/2 of the diameter of the scope tube. Because of the optical properties of the scope the sight height can be measured at the scope rather than the muzzle.
For iron sighted rifles and handguns simply measure the diameter of the barrel under the front sight Then measure the distance from the bottom of the barrel to the top of the front sight and subtract 1/2 of the barrel diameter.
Rounding the measurement to the nearest 1/10 inch is close enough as a 1/10 inch error will produce a difference of less than one inch from the line of sight at 1000 yards.
Q. What is the penetration of bullets fired into water and underwater?
A. Hatcher's Notebook, describes some water firing tests. Based on tests using US M2 .30-06 ball ammo (152 gr at 2770 f/s) at 90 degree impact angle to water's surface one would be "safe" at 3.5 to 4 feet and at 30 degree impact angle one would be "safe" at 2.5 feet. It would probably be safe to assume that at 5 ft one would be pretty safe from any normal rifle fire. Something like the M2 .50 cal would penetrate deeper and several acquaintances say that 5-7 feet at a 30 degree angle--typical for a strafing run) would be about right. From aircraft strafing one would want to get as deep as possible.
A friend also did some test firing of various handgun rounds into a 5-gallon plastic bucket (the paint/spackle kind). Firing at 90 degrees into the water no rounds dented or penetrated the bottom of the bucket. (However, the shooter got very wet.) Figure a maximum penetration of about 12-15 inches and probably a lot less.
Hatcher also describes some tests on firing completely submerged firearms. Using the M1911 pistol and M1911 ball ammo the bullet passed successively thru 16" of water, a 7/8" soft pine board, 6" more of water, and finally came to rest against a second board, making a deep dent in it. The pistol did not quite eject the empty cartridge, but jammed with the slide part way open and the cartridge caught in the ejection opening. The pistol was not damaged.
Using a 1903A3 service rifle barreled action and M2 ball ammo only partial data was able to be obtained as the action only left 6" of travel in the tank. Therefore no attempt was made to place anything inside the tank to gauge penetration, but rather, four soft pine boards 7/8" thick were placed outside the end of the tank and in line with the bore. When the rifle was fired, the bullet penetrated about 6" of water, the 3/64" steel side of the tank, all four boards, and disappeared inside a solid oak plank to a depth of about 2" the bolt could not be opened by hand, but yielded easily to a few light taps with a rawhide hammer.
In a test conducted by a friend of mine using 230 gr FMJ ammo he submersed a 1911 to a depth of about 2 feet in a pool, and shook it thoroughly to ensure that all the air was flushed out of the insides of the pistol. The target was a sheet of 1/8" decorative interior wood paneling. At 5 feet, the projectile did not impact the panel. At 4 feet, it impacted but left no mark. At 3 feet it left heavy dents. At two feet it penetrated. Very high pressure signs were observed on the fired cases.
When fired underwater penetration appears to be increased compared to a shot into the water as the high velocity water/air interface has a greater effect on the bullet than a solid water interface on an accelerating bullet.
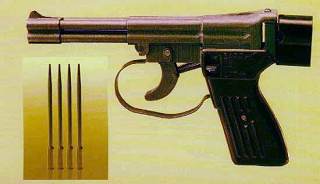
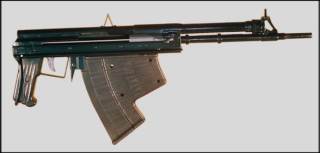
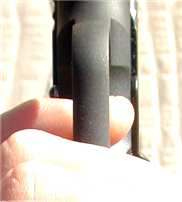
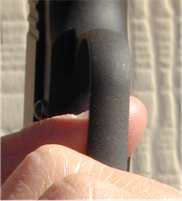
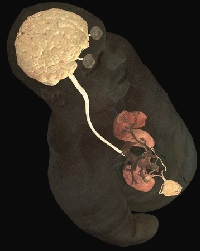
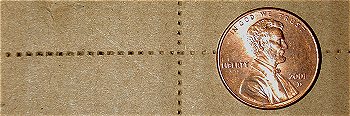
The Russians produced two special firearms in the 1970s for their SPETzNAZ special Operations forces that were designed to be fired underwater. The 4 barreled SSP-1 pistol fires a 203 gr long pointed rod of about 30 caliber with a length/diameter ration of about 21:1, at a muzzle velocity of 820 f/s. It has a reported effective range of about 36-55 feet depending on the depth. There is also an APS gas operated rifle based on the AK 47 system with a 20 rd box magazine. It fires a similar projectile weighing 284 gr at 1197 f/s and has an effective range of 32 to 98 feet depending on the depth. Although they can be fired in air the accuracy is very poor because the projectiles are not spin stabilized.
|
|
| Russian SPS-1 Pistol | Russian APS Rifle |
|
|
|
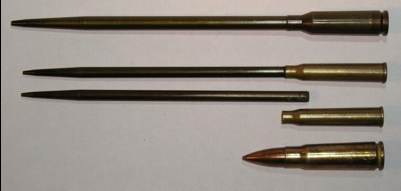
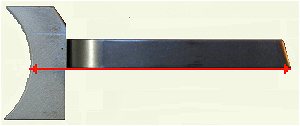
Close up of ammo (7.62 x 39 shown for comparison) |
|
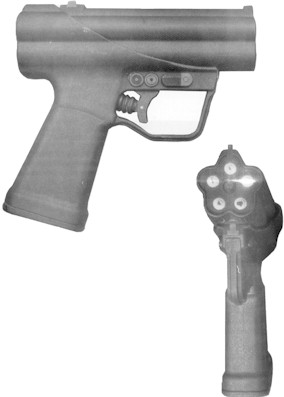
A similar firearm is/has been made by H&K. Known as the P11 it is a 5-shot "pepperbox" design that fires a 7.62 x 36 mm cartridge. It has an in-air range of 30 - 50 meters and an underwater range of about 15 meters.. The "darts" of the P-11 are fin / drag stabilized and are about 10 cm or almost 4 inches in length. The P-11 darts are rocket propelled and are fired electrically. Little else is known about this firearm or its ammunition.
 |
Glock apparently makes a "maritime spring cup" for the striker that allows Glock pistols to operate reliably under water.
As a follow up I have often been asked if there are any special procedure that are used by individuals in underwater teams that carry standard arms. The following is a condensed reply from a UDT member.
Q. What is the performance difference between lead, steel and bismuth shot?
A. Steel shot has a density of about 74 percent of lead and bismuth is about 91 percent as dense as lead. The following table shows the ballistic differences between the different shot based upon #4 shot size (.13") and commercial loadings. This table is based on a GS drag model ballistic coefficient of approximately .027 for lead, .020 for steel, and .025 for bismuth, and .029 for "heavy shot" #4 shot and the kinetic energy is for a single pellet.
| Range | #4
Lead shot (3.24 gr) |
#4
Steel shot (2.43 gr) |
#4
Bismuth shot (2.91 gr) |
#4
"Heavy Shot" (3.42 gr) |
||||||||
| Vel | KE | Drop | Vel | KE | Drop | Vel | KE | Drop | Vel | KE | Drop | |
| 0 | 1200 | 10 | 0.00 | 1325 | 9 | 0.00 | 1200 | 9 | 0.00 | 1200 | 11 | 0 |
| 10 | 1000 | 7 | 0.14 | 1021 | 6 | 0.12 | 986 | 6 | 0.14 | 1012 | 8 | .14 |
| 20 | 856 | 5 | 0.62 | 828 | 4 | 0.57 | 836 | 5 | 0.64 | 874 | 6 | .61 |
| 30 | 745 | 4 | 1.59 | 691 | 3 | 1.54 | 722 | 3 | 1.63 | 767 | 4 | 1.55 |
| 40 | 656 | 3 | 3.18 | 586 | 2 | 3.24 | 631 | 3 | 3.30 | 680 | 3.5 | 3.07 |
| 50 | 582 | 2 | 5.58 | 502 | 1 | 5.96 | 555 | 2 | 5.84 | 607 | 3 | 5.35 |
| 60 | 519 | 2 | 9.1 | 432 | 1 | 10.00 | 491 | 2 | 9.52 | 545 | 2 | 8.58 |
| Shot Composition | |||
| Type | Composition by weight |
Density gr/cc | Useable in lead only barrels |
| Iron (Steel) | Iron | 7.9 | No |
| Iron/Tungsten/Nickel | >1% Iron, up to 40% nickel, the rest tungsten | 12.0 | No |
| Iron/Tungsten/Nickel | 62% iron, 25% tungsten, 13% nickel | 12.0 | No |
| Tungsten/Bronze | 51.1% tungsten, 48.9% bronze | 12.0 | No |
| Tungsten/Iron/Copper/Nickel | 59% tungsten, 13% copper, 7% nickel, 21% iron | 12.0 | No |
| Bismuth/Tin | 97% bismuth, 3% tin | 9.4 | Yes |
| Tungsten Matrix | 95.9% tungsten, 4.1% polymer | 10.4 | Yes |
| Lead | 94-97% lead, 3-6% antimony | 10-11.1 | Yes |
Tests have shown that for the same shot size the steel shot penetrates about 33 percent less than lead shot and bismuth shot about 10 percent less than lead shot in water soaked stacks of paper.
Q. How are the shotgun shot size designations determined?
A. While shotgun gauge sizes are based upon the number of pure lead balls of bore diameter needed to weigh one pound, shot sizes are kind of arbitrary. Unfortunately there is no simple answer for shot as there are several systems. As an example our #6 shot size is also known as 5 in the UK and Italy, K6 in Holland, and 3/A in Turkey. In Europe the current practice is to just list the shot size by its actual diameter in millimeters--#6 shot being 2.79 mm.
You will note that in all non-dimensional systems cases the higher the number the smaller the shot size. In the US it is based on the mesh of the screen used to sort the shot--the finer the mesh-the more "threads per inch" so to speak--the smaller the shot passed. The sizing screens are sized in increments of .01 "
Interestingly, there is a strange property in all this for the common US system--the diameter of the shot in hundredths of a inch is approximated by subtracting the shot size number from 17. Thus #6 is .11"
"Buckshot" is another matter because buckshot is usually swaged in a press instead of being formed by dropping molten lead through a sieve and I have never seen an explanation of buckshot sizes. As with shot the size, designation varies a bit around the world with our 000, 00, 0, 1, and 4 buck being called things 6/0, 5/0, 4/0, etc in other countries.
Q. What is the "Coriolis Effect" and do I have to worry about it?
A. The Coriolis Effect, or Coriolis Force, is an additional force or acceleration acting on the motion of bodies in a "rotating system" of reference. Thus, an object moving above the earth in a generally northerly or southerly direction, and with a constant velocity relative to space, will be deflected in relation to the rotation of the earth. This deflection is clockwise in the northern hemisphere and counterclockwise in the southern hemisphere. The effect is named after the French physicist Gaspard de Coriolis, who first analyzed the phenomenon mathematically. Coriolis forces are of considerable importance in determining prevailing winds and ocean currents and also in the analysis of the flight paths of very long range projectiles such as artillery, missiles, and rockets.
However, the effect is generally only noticeable at extreme ranges beyond normal small arms fire but it does need to be taken into account for long range artillery and missile fire. The amount of its effect depends on the north/south latitude at the firing point. As examples see the tables below for the 7.62 x 51 mm NATO (typical small arms projectile) and the 95 pound M107, 155 mm howitzer projectile at its maximum range. (Trying to shoot something with the 7.62 NATO at 2000 yards is a fool's errand.) If you are trying to hit something at 2000 yards with a rifle you have more to worry about than the Coriolis effect--like maybe learning how to use that radio to call in artillery or an air strike.
|
Coriolis Effect on 7.62 mm
M80 Ball Bullet |
|||
| Zeroed Range (yd) |
Firing
Direction (Compass degrees) |
Impact height (in) |
Impact
Deflection (in) |
| 500 | 0 (North | 0 | .6 |
| 500 | 90 (East) | .6 | .6 |
| 500 | 180 (South) | 0 | .6 |
| 500 | 270 (West) | -.6 | .6 |
| 1000 | 0 | 0 | 2.8 |
| 1000 | 90 | 2.8 | 2.8 |
| 1000 | 180 | 0 | 2.8 |
| 1000 | 270 | -2.8 | 2.8 |
| 2000 | 0 | 0 | 15.6 |
| 2000 | 90 | 15.9 | 15.9 |
| 2000 | 180 | 0 | 16.1 |
| 2000 | 270 | -15.9 | 15.9 |
|
Coriolis Effect on M107
155 mm Howitzer Projectile |
|||
| Maximum Range (Meters) |
Firing
Direction (Compass degrees) |
Maximum Range
Effect (Meters) |
Deflection (Meters) |
| 17970 | 0 | 0 | 37 |
| 90 | 25 | 56 | |
| 180 | 0 | 74 | |
| 270 | -25 | 56 | |
An example of extreme range effect is the infamous 210 mm "Paris Gun" used by the Germans in WW I. It fired a 233 pound projectile at about 5400 f/s and was used to shell Paris at a range of 75 miles. It was fired from Crépy-en Laon which was at a latitude of 49.5 degrees North, and the gun was fired at an azimuth of 232 degrees (west-southwest). The gunners had to account for the fact that the projectiles landed 393 meters short and 1343 meters to the side of where it would have hit if there was no Coriolis effect.
This data was excerpted from Robert McCoy's book, Modern Exterior Ballistics-The Launch and Flight Dynamics of Symmetrical Projectiles.
Q. How fast is a bullet rotating?
A. The speed of rotation depends on two things: the rate of the rifling's twist and the muzzle velocity. Twist is measured in turns per distance such as 1 turn in 10 inches, expressed as 1:10. To compute the bullet's rotational speed in revolutions per second the formula is:
T = Twist
V = Velocity in f/s
R = Rotations per minuteR = (12/T) * V * 60 = (720 * V) / T
As an example if we have a bullet with a velocity of 2700 f/s and a twist of 1:10 the formula would be:
(720 * 2700) / 10 = 194,400 rpm
Rotational speed decays much more slowly than velocity decay. The factors effecting the spin decay, include the bullet's shape, moment of inertia, and condition of the surface of the projectile and the forces are miniscule compared to the frontal air drag.. Most of the research in this area was done by the Ballistics Research Lab at Aberdeen Proving Ground and Picatinny Arsenal on artillery projectiles which have narrow driving bands that are engaged by the rifling rather than full body length rifling engraving on the bullet as with small arms projectiles. Thus there are some approximations made on spin decay for small arms projectiles. For the M80 147 gr 7.62 NATO bullet at 2750 f/s which has been studied and investigated thoroughly, the approximate spin decay at range is as follows and the decay rate is linear and probably holds true for other small arms cartridges
| Range | Muzzle | 100 | 200 | 300 | 400 | 500 | 1000 |
|
Percent of spin remaining |
100 | 98 | 96 | 93 | 91 | 89 | 75 |
| Bullet RPM | 198,000 | 194,000 | 190,000 | 184,000 | 180,000 | 176,000 | 148,500 |
Q. What is the proper diameter for flash holes?
A. Military specifications for flash holes are .078" + .004" for 7.62 mm and .30 M2, and .080" + .004" for the 5.56 mm. Commercial cases of all calibers use similar dimensions. You can use a 5/64" (.0781") and a #45 drill (.082") as min/max gauges and be well within tolerances. Most folks simply standardize on a #46 (.081"). Note that some new commercial "lead free" ammunition uses a substantially larger flash hole and according to several sources these case can be reloaded normally.
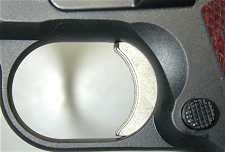
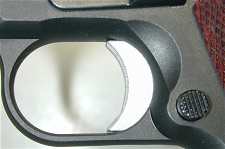
Q. What is the difference between short, medium, and long triggers on the Colt 1911 .45 pistol and why are they available?
A. When the trigger is pulled it should travel straight back. It the trigger is too long for the user there will be a tendency to push the trigger to the left (for right handed shooters) or if to short to the right--which can affect the point of impact by moving the pistol. (This is easily seen by the "scuffing" of the frame on the side of the trigger.) Because the 1911 design lends itself to easy trigger replacement users can get the right length without having to have major surgery performed.
If you find that your trigger is too long or short (see the pictures below) consider changing it. Most shooters find that their triggers are too long. You may be surprised how it affects your shooting.
 |
 |
 |
| Short Trigger | Medium Trigger | Long Trigger |
To check your trigger fit, grip your pistol, insuring that the barrel axis is in line with your forearm and place your finger on the trigger.. A line drawn across your fingernail to your first knuckle should be at close to 90 degrees to the bore axis.
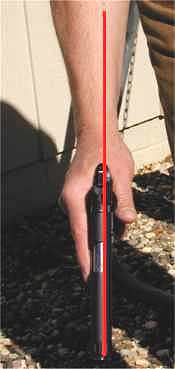 |
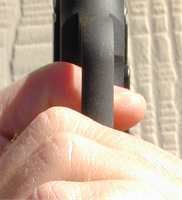
Too Short |
Correct |
Too Long |
| « With a proper grip the pistol's bore is in line with the axis of the arm | |||
As an idea of actual size the following measurements were taken from several sample triggers. Distances were measured along the bottom of the trigger stirrup from the bottom of the sloped rear face to the center of the front of the trigger pad. (Note: Some manufacturers specs are given measured from the very rear of the stirrup to the farthest point on the trigger which adds about .2" or so to the measurements below. What is needed is a trigger about 2.18" ( long to fill the gap between the "medium" and long triggers. If you know of such a trigger send me a sample and ordering particulars and I'll include it here.
 |
|
| Trigger | Length |
| Short (Original 1911 GI and commercial Colts) | 2.0" - 2.05" |
| Medium (Commonly called "short"
by some manufacturers of aftermarket triggers) |
2.12" - 2.13 |
| Long (Commercial and national match) | 2.24" - 2.25" |
Q. What are "option" and "item" targets?
A. The "option and "item" targets were the original targets used in practical shooting competition. The "option" target uses circular scoring rings and is the classic training target as it encourages center of chest area hits. The "item" target uses rectangular scoring areas and is slightly more anatomically correct and it (or variations of it) are the most common target used in practical shooting competitions today. The scoring rings on either type are not visible to the shooter from firing distances and the targets are either a neutral color or mottled finish so as not to have a distinct aiming point. Both targets are nominally scored based upon the power factor of the ammunition. Major calibers are usually scored 5, 4, 3 and minor calibers are scored 5, 3, 2, but in my humble opinion they should probably be 5, 3, 1 and 5, 2, 1. Most users specify that any edge hit must be farther in than 1/2" to qualify as a "hit" and these targets are frequently seen with a 1/2" border drawn around the edge. There are also several variations of these targets with beveled corners in use by IDPA and the USPSA. However, while these targets approximate the size of the average human, both of them severely distort the head and shoulders area which I believe can lead to an incorrect aiming point on a live target.
![targets (7k gif]](targets.gif) |
Unfortunately, some folks get carried away with the design of a targets. There are some targets that have an anatomical overprint for scoring. In my opinion awarding a high score because some round misses the center of the target by 8 inches and by chance hits a "vital" organ is wrong.. For most purposes targets don't have to be exactly anatomically correct as the idea is to teach tight grouping on the target in the proper place, and besides human bodies vary in dimensions a tremendous amount.
However, a more realistic representation would look something like that shown below. This target is an attempt to make up an easily reproducible, anatomically more correct shape wise, and yet easy to score target. As far as scoring the target, the idea that the hit in the next area outside the "A zone" being worth 80% of the A zone is medically erroneous. On a real person, especially using a pistol, a hit to this area might take from 3 to 4 times as long to become effective. In fact it, might not be effective at all. A better scoring system than the traditional 5/4/3 (major), 5/3/2 (minor) would be, I believe, 5/2/1 (major), 5/1/0 (minor). Also note that the "A" zone, while it anatomically extends up the middle of the neck it is not shown on this target as the idea is to shoot for the body "A" zone. The head zone only counts as an "A" zone if the head is the required target since we are training for the vital organ area. (If you want to get anal you can make the head box 4" wide by 3" high. The "lower" section can be used to create a full size standing target to simulate 2-legged agressors. If you have the time and want to be obsessive you can put 1 inch, 45 degree bevels on the corners of the head. This target is my standard training target and looks a lot more realistic than the IPSC/IDPA type targets when covered by a t-shirt.
|
|
|
| "Improved"
target (Blue line is 30" length) |
Lower section |
In most training a running target is simulated simply by moving a standard target sideways. This is unrealistic as people don't run that way most of the time. A more accurate "sideways " target is below.
|
|
|
Sideways "improved"
running target |
As mentioned, the problem with most target scoring marks is that the center of the "A" zone is placed lower that the real vital area is located which can instill a less then effective aiming point.. Keep in mind that the majority of vital organs are in the top half of the classic "A" zone extending up to just above the eyes rather around the center of mass as is shown in the left picture below. Ideally, you want to basically place your shots at about nipple height rather than the visual center of mass. The right graphic below shows just how small a target the central nervous system is in real life.
 |
 |
| Organ Placement | Central Nervous System Placement |
If one wants to be even more anatomically correct for some reason one could use the homemade target shown below and score it, 5/2/1 or 5/1/0. However, I would still draw a line across the top of the main "A" zone for scoring purposes
|
|
|
"Anatomical" Target |
While the anatomical length of the targets above is 18" x 33" using the standard 18" x 30" size won't impact anything that is important.
The proliferation of different designs of commercial flat targets is kind of silly in my opinion. At last count I found well over 150 types of "humanoid" targets in a rainbow of colors "approved" by different agencies and organizations from just one manufacturer, and all available from prices ranging from 25 cents to $3 (!) a piece. Why the plethora of targets? Most likely everyone wants their special design because then they are cool. There are also all kinds of scoring systems and different shaped zones which have no real value other than to sell targets or allow competitors to achieve meaningless scores. The above targets work just fine for general and advanced training and qualification use since their purpose is simply to teach proper hits. (And beside they are very inexpensive to make.)
If one wants (or needs) a more realistic target for very advanced training and live fire scenarios one should simply go to the life like 3-D molded targets which can be dressed in clothing or 3-D shaped cardboard ones if price is a consideration.
The Flat Target Problem
The disadvantage of flat targets for advanced training is that
from other than straight on their scoring rings can put hits outside of the actual vital organs as shown
below. 3-D targets help to overcome this problem, especially if there is
an internal 6" balloon or tubular "vital zone" inside of them, or
if the actual
"scored" flat target is placed about 6" directly behind the
"shooting" target.
 |
|
The problem with flat targets. |
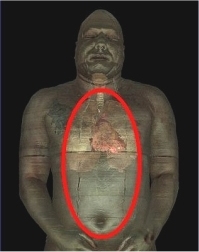
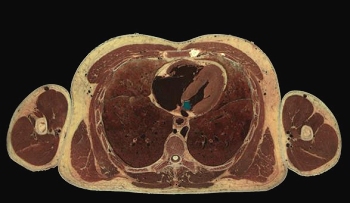
The picture below is top view of an actual sectioned human body, and you can easily see just how small the actual "vital zone" is.
 |
|
Sectioned Man |
Anatomical images courtesy University of Colorado, Center for Human Simulation - http://www.uchsc.edu/sm/chs/open.html
Speaking of dimensions, while the anthropometric data varies slightly depending on the source, the table below gives the average dimensions of a typical 95th percentile human male. You can use these dimensions if you are setting up targets.
| Standing height | 70" |
| Kneeling height | 42" |
| Prone height (aiming rifle) | 12" |
| Crawling (hands & knees) height | 30" |
| Head height | 9" |
| Head width (frontal) | 6" |
| Head width (sideways) | 8" |
| Body width (frontal) | 18" |
| Body width (sideways | 10" |
A tip. You can easily make your own targets from left over appliance boxes, available for free just about everywhere. The folks at the local Sears know me by first name. ;-) Just stack cardboard sheets and cut to 18" x 30" (or whatever) on a band or circular saw with a fine blade and then notch out the head area. I have made up a template out of scrap 1/8" masonite to use for putting on the scoring lines.
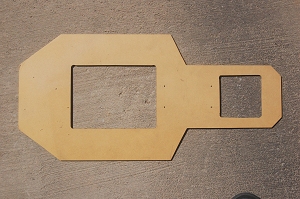 |
Scoring lines should not be visible to the shooter. While you can mark targets with a light pencil another way to mark them is with a dress maker's tracing wheel which is used with a marking paper on fabric. Used on cardboard, with or without any marking paper, this tool will leave a line of fine dots in the cardboard that are easy to score but hard to see from any distance. A couple of cans of subdued tones of matte spray paint will let you color them to your heart's content.
 |
 |
Reduced Size Practice Targets
By simply making a 1/3 scale target you can use feet for yards of distance for your subcaliber or dry firing practice. Click here for a 1/3 scale silhouette target in MS Word format.
Click here for information on inexpensive target stands.
Please email comments to Fr. Frog by clicking here.
| Back to Q&A Index | Ballistics Main Page |
| Back to Fr. Frog's Home Page |
Disclaimer
As far as I know all the information presented above is correct and I have attempted to ensure that it is. However, I am not responsible for any errors, omissions, or damages resulting from the use or misuse of this information, nor for you doing something stupid with it. (Don't you hate these disclaimers? So do I, but there are people out there who refuse to be responsible for their own actions and who will sue anybody to make a buck.)
![]()
Updated 2018-01-30