 |
|
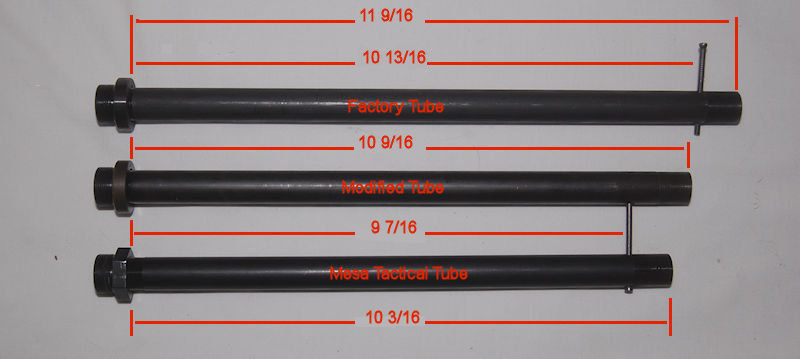
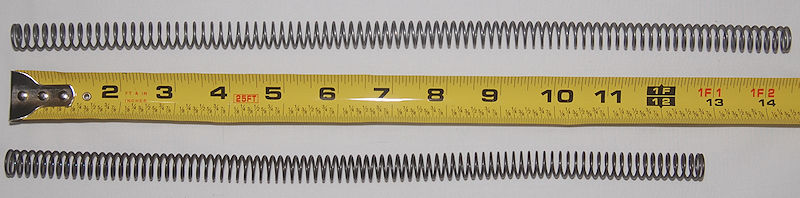
(top) Factory
return spring ( #12), (bottom) Mesa Tactical's"short spring" |
Shortening The Mossberg 930 Stock
The Mossberg 930 shotguns, particularly the SPX line, are one of the better semi-auto shotguns and are becoming very popular. The only major issue for some people is the very long (14 inch) length of pull. This makes it difficult for most people to quickly mount the weapon, especially when wearing heavy clothing or load bearing equipment. While Mossberg officially denies it is possible to shorten their synthetic stocks, it is possible to do so with a little work-like the Mesa Tactical Urbino pistol grip stock. Mesa Tactical does offer a Mossberg 930 Shortening kit (sku 91140) but it won't work with the factory stock as the spring tube is too short as it is the same tube supplied with their Urbino stocks. While trying to help out a friend who has physical issues with pistol grip stocks and who needs a short stock I decided to explore some possible options Presented here are some methods of shortening the LOP of the synthetic stocked Mossberg 930 and some other relevant information.
I assume that you know how to disassemble and reassemble, lube, and function check your 930, and that you are handy with tools.
The first two options are the most elegant but both are work intensive. They involve modifying the existing spring tube and using one of Mesa Tactical's shortened springs.
Note that
YOU CANNOT
SIMPLY SHORTEN THE FACTORY RETURN SPRING.
Don't even think about doing that. You will damage your firearm.
The Mesa Tactical
short spring has a MUCH DIFFERENT weight rating and loading. Unfortunately,
Mesa Tactical, for some reason,
does not seem to want to
sell their short spring separately.
However, after some intense begging, pleading, and groveling ...
I
now have a limited number of Mesa Tactical's short springs for
sale.
Only 5 left. Click here for details.
|
|
(top) Factory
return spring ( #12), (bottom) Mesa Tactical's"short spring" |
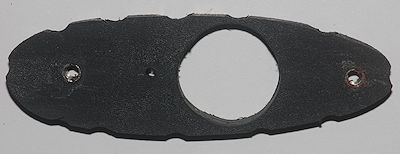
Either the Kick-Eez 15/16 inch thick (302-8-M), the ¾ inch thick Kick- Eez 302-6-M-B, or the ½ inch thick Kick-Eez 302-5-M-B pad, work well and give you some LOP options, although other pads (if grindable) might work. The Kick-Eez 302-5 pad being only ½ “ thick gets you the shortest LOP while still mitigating the felt recoil You will have to either relieve the the protrusions inside the stock where the original pad screws went, cutting or grinding them back about the thickness of your home made adapter plate or the InnovaTac adapter to fit around them. (More on that later.)
Using the ½ inch recoil pad you can take just about 1¼ inches or a little more off of the stock and get close to a 12 inch LOP with a little extra work. Cutting the stock 1 inch gets you a 12½ inch LOP with the ½ inch pad, and cutting ½ inch gives a 13" LOP.
 |
|
1 inch cut off stock |
You should remove the trigger assembly from the receiver before starting work.
It will help to have access to a lathe for this project. Other tools and supplies needed are:
 |
|
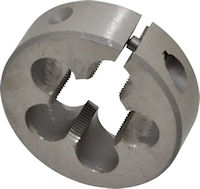
"Split" die |
The dies and taps are available on eBay.
Spring tube tool
Mesa Tactical includes a nifty little tool in their Urbino kit that make the removal of the spring tube internals and the tube itself easier. Unfortunately it is a little too short to work well with this tube modification, but can be used to remove the factory tube. You can make a longer tool from a ½ inch lag screw that has an 1½ inch unthreaded section. I used a 7 inch lag screw that had an unthreaded section almost 1¾ inch long.
 |
Cut the threaded portion off the bolt and square the end.
File, cut, or mill a notch about 3/16 inch wide and ¼ inch deep.
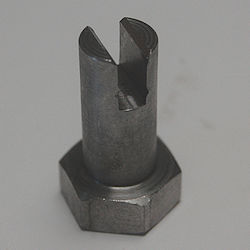 |
|
Spring tube tool |
Spring tube modification
|
|
|
Comparison of the various
spring tubes |
(If you have removed the receiver bushing nut from the tube the hole should be drilled 915/16 inches from the solid end of the tube.)
Stock retention nut
The 5/8-32 nuts are not a common item and are usually either too thin or 1 inch or more across the flats. The factory nut (#41) has the advantage of only being ¾ inch across the flats but it is much to long for the shortened stock and tube so it will need to be cut.
The factory nut is nominally .435 inches thick. If you carefully cut the nut in half you can get 2 thin nuts about .2 inches thick with plenty of thread.. The is best done on a lathe using a thin cut off tool and ensuring that the nut is square in the lathe's chuck.. You will probably have to clean up the threads with a 5/8-32 tap and sand off any burrs on the cut side. Touch up the cut side with cold bluing, oil, and set aside. Spare factory nuts are available from Mossbergs store.
https://www.mossberg.com/store/930-935-940-stock-retention-nut-blued-16765bl.html
If you need a cut factory nut I have a couple of them in stock. Click here to contact me for details.
Note: The return spring retention pin (#10) is held in place by spring tension and not the factory spacer/collar. If you are the worrying type you can put a wrap of metallic furnace tape around the tube over the pin holes.
|
|
|
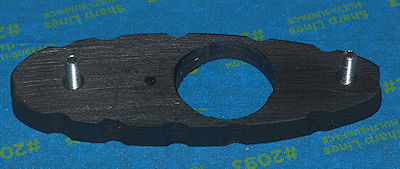
Factory retention nut (16765BL) and cut nut |
Nut spacer
If using the cut factory stock nut you can skip this. If using a larger diameter nuts (other than ¾ inch across the flats) you'll need to make this spacer so your nut contacts the stock retention plate (#70).
|
|
|
Original washer (left) finished spacer (right) |
Shortening The Stock
There are a 4 options.
Option A - Install the Mesa Tactical Ubino pistol grip stock kit. (About $155)
This gives you a 12½ inch LOP, numerous slinging options, and an optional check riser.. Caveat: While pistol grip stocks work well for most people, many people have an issue with operating the Mossberg's tang safety with pistol grip stocks, even if the safety movement is lightened. One solution is to train to wipe the safety off with your support hand as you mount the shotgun. I have found that I like the Urbino stock setup very much and it is well made and very comfortable.
Option B - InnovaTac pad adapter kit.
The Finish company, InnovaTec, now makes a US spec pad adapter (Select the 79.3 mm / 31/8 inch option when ordering) that lets you use any US recoil pad with the standard 31/8 inch screw spacing. Either the Kick-Eez 15/16 inch thick (302-8-M), the ¾ inch thick Kick- Eez 202-6-M-B, or the ½ inch thick Kick-Eez 302-5-M-B pad, work well. They will gladly ship to the US and they are looking for a US distributor.
 |
|
InnovaTac adapter kit |
Contact them through their website at : https://www.innovatac.fi/tuote/rpa10 for details.
There is a YouTube video on the installation process at https://www.youtube.com/watch?v=DMafrdzJy68. The video would also apply to the homemade adapter below.
 |
 |
|
Cut back the raised
screw studs the thickness |
Cut back screw studs |
Note: This applies to both options B and C. When grinding back the screw posts by hand I have found that if you carefully drill straight down the existing screw hole
about the thickness of the insert using a 3/8 inch drill running slowly, that it is much easier to grind the remaining material away. A Dremel #115 bit works well for cleaning
things up. The depth should be a little more than the thickness of your insert because your epoxy will take up the space. Note, that depending on tolerance stacking you
may have to grind about a third of the inside of the screw post in the heel of the stock (right side in the picture) down about 3/16 inch to prevent epoxy from getting in the screw insert. It helps to put a small piece of tape on the underside of the hole in the adapter to keep glue out.
Dremmel #115 bit
Option C - Make your own pad adapter.
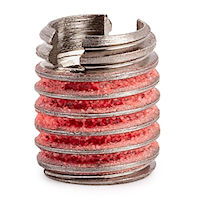
If you are handy and don't mind some effort you can build up a couple of layers of Kydex using epoxy or PVC cement and make a homemade version of the InnovaTac adapter You will need 2 screw-in threaded adapters 1/4-28 outside threads and 8-32 inside. E-Z Lok part number is 313-008. Available from McMaster-Carr as sku 94165A223 in 5-packs or from some other sources. Use the same recoil pads as above. If you want beefier screws you can use 10-32 screws with the E-Z Lok 313-332 which uses a 5/16-24 external thread ("I" drill - .272 inch) or their 303-332 insert which uses a 3/8-16 external thread (5/16 inch drill - .313 inch) and the corresponding taps. I used the 8-32 inserts because I had a bunch in stock. Your choice. I have some extra 8-32 x 1/4-28 inserts if you need them. Click here to contact me for details.
 |
|
E-Z Lok screw insert |
You will need:
Epoxy glue (I have had excellent results with 3M's 8005 adhesive and JB-Weld's Plastic Weld.) See note at end of article.
PVC pipe glue (recommend Christy's 8 oz. PVC Red Hot Blue Glue and Purple Primer Handy Pack (Available from Home Depot)
Sheet of fairly thick Kydex, cut into several pieces about 2 x 6 inches and glued together to get about a .4 inch thick piece to make the stock insert. (I used 2 scrap pieces of nominal .120 inch and 2 pieces of .080 inch to get a ..39 inch thick slab)
Painters tape
3 x 6 inch piece of scrap Masonite or other thin wood.
¼-28 tap
#3 drill
¼-28 x 8-32 threaded inserts
2, 8-32 x ¾ inch pan-head machine
screws (to final attach the pad)
Note that some pan head screws have very large diameter heads. Most
of the factory pad screws I have measure have heads that run about .335
inch. If the screws you are using have significantly larger diameter
heads turn the heads down to something close o the factory pad screws, for
ease of insertion.
2, 8-32 x ½ inch machine screws (to attach insert to board for gluing)
Whatever pad you are using.
Glue the 2 x 6 inch sheets of Kydex together using the PVC pipe glue and primer to make an assembly between .35 and .40 inches thick. Clamp together tightly, and allow to set for at least several hours or preferably overnight. It helps to roughen the mating surfaces of the Kydex with some 80 grit paper and clean with isopropyl.
Cut back the factory stock the amount you want (1 inch for a 12½ LOP using the ½ inch pad) and sand the edges to remove any burrs and ensure squareness.
Cut the screw pads inside the stock back just a little more than the thickness of your Kydex assembly. - See above note
Take the piece you cut off off of your stock and carefully deburr the inside and outside edges of the cut (smaller) side.
Place on your Kydex assembly, cut (smaller) side down.
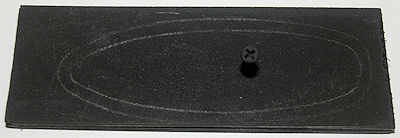
Using a very sharp pencil trace the outline of both the inside and outside edges of the stock piece. on your Kydex. It will be necessary to hand complete the inside line because of the studs in the stock.
Drill a small hole in the center of the inner line and insert a screw to use as a handle.
Use the outside line for coarse shaping and then gradually and carefully grind down towards the inside line, checking frequently, until you get a loose, but not sloppy fit in the end of your stock. If you just stop short of grinding to the line you'll have enough to carefully fit the adapter into the stock. Put a slight taper on the edges so that the bottom is just a little smaller than the top. This will help your epoxy to flow better. Work slowly. Check fit frequently.
 |
 |
|
Kydex sheet assembly (about .39 inch thick) |
Tracings on the Kydex with
screw for easy handling. |
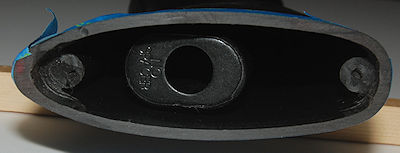
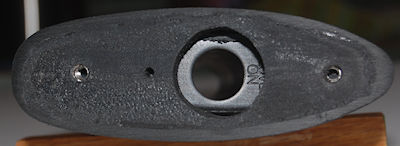
Once fitted properly, if using the modified factory nut, drill a 11/8 inch hole centered 21/8 inches above the toe of the cut stock with the insert in place so you can remove/install the stock with a thin wall ¾ inch socket. You might need to slightly bevel the top inside of the hole to get a flush fit. I used a 11/8 inch Fostner bit running at 480 rpm and drilled slowly. Back the Kydex up with a piece of wood when drilling. If you are using one of the larger nuts you may have to cut the insert into 2 pieces to get clearance for the nut.
With the insert in place measure down 7/8 inch inch from the outside edge of the top of the stock centered on the insert and mark it. This ensures you have enough material exposed to trim the pad to fit the stock
Measure down 31/8 inches from the center of the first hole and mark. Note that the holes should be centered on the toe and heel of the stock.
Using a #3 drill drill 2 holes where indicated and tap with a ¼-28 tap.
Put a little epoxy in each hole and carefully screw in the ¼-28 x 8-32 insert until flush with, or very slightly below, the top of the insert. If you want bigger screws you can use 10-32 screws with the E-Z Lok 313-332 which uses a 5/16-24 external thread ("I" drill - .272 inch) or their 303-332 insert which uses a 3/8-16 external thread (5/16 inch drill - .313 inch) and the corresponding taps. Your choice
Remove the stock insert and grind or file a number of grooves (about 3/32 to 1/8 inch deep around its outside edge (see picture of the InnovaTac adapter, above for the idea). You can use a Dremel tool and a stone or the #115 burr tool to form the indents. This will allow the epoxy you will use to secure the insert to flow and make a stronger bond. Do not glue in place at this time.
Take the scrap sheet of Masonite and cover it with painter's tape. This will allow you to remove the Masonite after the epoxy cures.
Cover the outside of the end of the cut stock with painter's tape right up to the end of the stock to prevent getting any epoxy on the outside of the stock.
Drill 2 holes 31/8 inches apart on the wood piece you cut. Remove the "handling screw" from the Kydex and screw this wood piece the to top of the insert with the tape facing the pad side of the insert using ½ inch 8-32 machine screws (to avoid hitting the stock projections.)
Rough up the inside parts of the stock where the insert will go, and clean both it and the edges of the insert with isopropyl alcohol to degrease.
Generously spread your epoxy in a ¼ inch band around the inside edge of the stock and the tops of the trimmed screw posts in the stock.
Insert the assembly fully into the stock so the tape covered wood is tight against the stock.
Stand the stock up vertically (apply a little pressure if possible) so the epoxy will settle around the insert (the reason you filed grooves around the edge of the insert) and allow to fully cure. according to the epoxy's directions
Unscrew the wood piece and clean up any tape residue on both the insert and stock. If there are any gaps around the edge of the adapter fill them in with some epoxy.
Sand the face of the insert to ensure it is smooth and then attach and fit your recoil pad .
The InnovaTac video at https://www.youtube.com/watch?v=DMafrdzJy68 shows what you are trying to accomplish.
If you are the worrying type you can further secure the insert with a couple of tiny pins (made from ½ inch brads with their heads cut flush and blackened) and insert them into drilled holes that are a very snug fit on the pin. one each, at the toe and heel of the stock and one on each side, about 1/3 of the way down from the heel of the stock. The holes should be about half the thickness of your insert down from the edge of the bare stock
 |
| Fitted Kydex insert with access hole, screw inserts, and notches |
 |
 |
| Mounted on taped Masonite | Glue- in setup. Marks just indicate to me where additional epoxy will probably be needed to fill in some spaces |
 |
 |
|
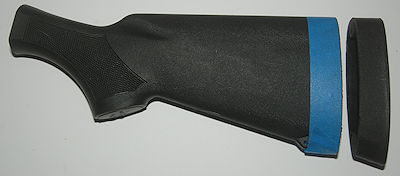
All done, less final sanding and assembly |
Completed 12½ inch LOP using a ½ inch pad |
Option D - Cutting some corners but still get a short stock
This is similar to B or C but eliminates the stock inserts and utilizes a recoil pad that is redrilled for the Mossberg's 3¼ inch screw spacing. (See below) The disadvantage of this method is that the recoil pad isn't as well supported as with B & C.
Follow the procedures for B & C but DO NOT grind back the screw studs. You will need to shorten the recoil pad screws and possibly deepen the screw hole (be careful not to drill though the outside of the stock). The one stock that was done this way has held up fine.
|
|
For Option D, DO NOT cut these back |
Option E - Minimalist Solution
This is the simplest procedure but it only gives you a very limiter shortening. The screw spacing of the Mossberg stock is 3¾ “ and standard US recoil pads won't work without having to drill new holes in the pad, which may or may not be doable depending on the pad you choose. You can drill new holes with the Kick Eez pads mentioned above but you'll have the original two hole left in the pad. You could probably fill them with a black flexible sealant. See the section on pad grinding for more detail.
You will need to use a cut factory nut (described above), trim the factory collar to ½ inch in length, and then trim the threaded end of the tube down to the top of the assembled tube, thinned nut/collar, first.
Miscellaneous Notes
Adhesives
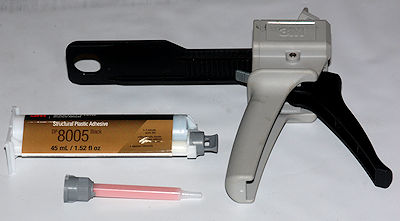
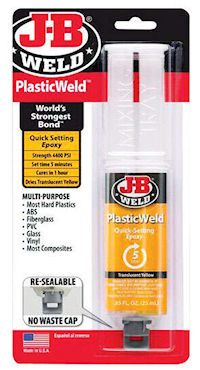
Both the 3M 8005 and the JB-Weld Plastic Weld are available on Amazon. You may be able to locate other sources locally. I've been using the 3M Product because I have it on hand from other projects and it's black and fairly thin.. If you are only doing one stock the JB-Weld is probably the way to go. Before applying rough up the inside area of the stock where the insert will sit with some 80 grit paper and degrease with some isopropyl alcohol.
With the 3M product you will need to get an applicator gun and nozzles
 |
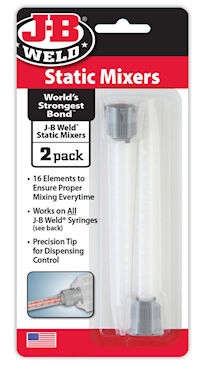
With the Plastic Weld you will need to get a mixing nozzle along with the epoxy.
 |
 |
Cutting the Synthetic Stock
I have had excellent results using my 10 inch table saw and a 90 tooth thin-kerf blade. The main thing is to ensure that the stock is held level and square against the rip fence. Clamping a long smooth board to the fence helps keep things square as does shimming the underside of the stock to keep it square against the fence. Measure things 3 times and check 4 times before sawing!
Grinding Recoil Pads
Some people like to cut the pad square on the top and bottom, while others like to have the angle on the toe. Eliminating the angled toe make it a little less prone to snagging. Your choice. Using one of the pad grinding jigs like the Graco jig https://www.brownells.com/gunsmith-tools-supplies/shotgun-tools/recoil-pad-tools/universal-fitting-fixture-prod25267.aspx makes life much easier.
Cover the bottom of the recoil pad with painter's tape and mount the pad.
Carefully scribe around the stock and pad. When scribing the pad use a very sharp scribe or an X-Acto hobby knife held at a 60° angle to get a tight fit, and a clean cutting of the tape.
Remove the pad and peal off the outside edge of the tape.
Using a pad sanding jig, trim the pad on a belt sander starting with a dry 80 grit belt to rough size it. Do not sand past the scribe/tape edge mark.
Switch to a wet 80 grit (use a “light oil” like WD-40 or Ballistol) to fine trim the pad. Work slowly.
Finish the pad with a wet 220/240 grit belt or by hand to give a smooth finish.
For a really nice finish, use wet 400 grit for a final sand and then apply furniture wax or ArmorAll,, and buff lightly (Thanks to KickEez for this tip.)
 |
|
Cut out tape sanding guide |
KickEez has a nice video showing how to grind the pad on YouTube at https://youtu.be/dKyv-zqqdYc or at https://kickeezproducts.com/pages/installation.
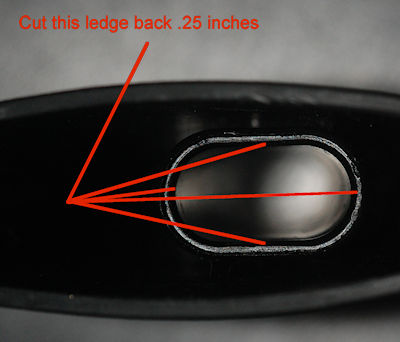
Modifying the stock retention plate opening in the stock for maximum stock shortness. (For anal retentives only).
If you need an even shorter stock (why, when you can get close to 12 inches with the above steps?) you can probably get about another ¼ inch if you have access to a milling machine or have a VERY steady hand. You can cut the ledge inside of the stock's spring tube channel down no more than ¼ inches (limited by the assembled location of the pin holes and plate) and the trim the outer edge to the same height above the insert as before. It needs to be evenly cut and remain level. You will also need to shorten the spring tube a little more. You are totally on your own here.
 |
|
Area of modification of the spring tube channel |
Now go out and practice, practice, practice!
 |
|
Nice job Dad! Take a
break and get me some food. |
Please email comments or questions to Fr. Frog by clicking here.
| Back to Fr. Frog's Homepage | Mossberg 930 Article |
Disclaimer
As far as I know all the
information presented above is correct and I have attempted to ensure that it
is. Everything above worked fine for
me, but your mileage may vary. I am not
responsible for any errors, omissions, or damages resulting from
the use or misuse of this information, nor for you doing something stupid with
it. (Don't you hate these disclaimers? So do I, but there are people out there
who refuse to be responsible for their own actions and who will sue anybody to
make a buck.)
![]()
Updated 2022-05-13 @ 1555